Showing posts with label crafts. Show all posts

12.27.2013

The Quiet Book - Made For An Elmo Loving Little Girl

© shoutingforha
I have been busy the past few weeks making another quiet book.  This one was for my adorable niece Charlotte, a.k.a. Chachie.  How cute is that?!

© shoutingforha
This time I decided to replace the usual grommets with a simple whip-stitched hole.  I find that the grommets are difficult to install and they are quite costly.


© shoutingforha
I stitched the pages together and then used a good old-fashioned paper punch to make the holes.  I was surprised by how easily the paper punch handled the two plies of felt.


© shoutingforha
I used embroidery floss and a whip stitch to reinforce the holes.  I really like how it looks and am thinking of ditching the grommets permanently.  What do you think?


© shoutingforha
This quiet book has all the standard pages.  


© shoutingforha
This was the first time that I used matching buttons for all of the train wheels.  I think it makes them pop.  


© shoutingforha
The barn is one of my favorite pages.  


© shoutingforha
I found some cute new animal fabrics to use inside the barn. I especially like the horses and the squirrel with the acorn.  


© shoutingforha
I tried to use girly colors throughout the book.  I found the belt at my local Goodwill for $0.99.  Score!


© shoutingforha

One of Chachie's greatest loves is Elmo.  She likes to watch Elmo on television, talks about him constantly and even dressed up like the furry red monster for Halloween.  I decided to create an Elmo page specifically for Chachie's book.

© shoutingforha
Elmo's nose, mouth and the letters E-L-M-O are attached with velcro.  Hopefully Chachie will enjoy making Elmo's expression change from happy to sad.


© shoutingforha
I tucked a picture of the cutie inside the tent just like in my other books.


© shoutingforha
All of the removable pieces are attached to the book with velcro.  I always make sure that I put the soft side of the velcro on the pieces and the rough side on the pages.  


© shoutingforha
I decided to forgo the use of grommets on the shoe as well.  I think that the reinforced holes will be just as sturdy.


© shoutingforha
I really hope that Chachie enjoys her Quiet Book.  I have a feeling that it will come in handy when her new baby sister makes an appearance in May.  

Here's a supply list for those who are interested:

11 white felt sheets 
4 red felt sheets
5 pale blue felt sheets
2 lime green felt sheets
1 lavender felt sheet
1 orange felt sheet
2 yellow felt sheets
1 black felt sheet
2 navy blue felt sheets
1 pale pink felt sheet
1 medium pink felt sheet 
1 bright pink felt sheet
1 bright blue felt sheet
1 cream felt sheet
1 bright purple felt sheet
1 dark purple felt sheet 
1 turquoise felt sheet
1 gray felt sheet
1 dark green felt sheet
1 army green felt sheet
misc. scraps of animal print fabric
4 1/2 feet of ribbon in a complimentary color
1 pkg. soft velcro
11 buttons 
1 shoe lace
1 belt 
3 snaps
1 short zipper
thread in a variety of colors
white and black embroidery floss
fabric paint in a variety of colors

To check out the other Quiet Books I've made click here.  

*** Feel free to use my design to make a quiet book for someone that you love. That said, I request that you refrain from using my design to create products for sale. Thanks!

10.17.2012

How to Make Fire Starters

© shoutingforha
Have you ever tried to light a fire in your fireplace or outdoor fire pit with no success?  Well, today is your lucky day.  I am going to show you a simple solution to this age-old problem...  Homemade fire starters.

I have to give credit for this project to my mom.  She always had a stash of these handy little guys within easy reach of our wood-burning stove and, as a result, lighting the fire was never a problem.

Here's what you will need:

A clean tin can
Remnants of old candles
A pot of water
Muffin tin
Paper muffin cups
Dryer lint or sawdust
A pair of scissors
Pine cones, pine straw, wood chips... 

Let's get started...

© shoutingforha
Using a sharp knife, chop up the old candles and place the chunks of wax the tin can.  Make sure to set aside the wicks as you will need them later on.  Place the tin can in a pot of water and allow it to heat on the stove until the wax has completely melted. 

© shoutingforha
Meanwhile, line a muffin tin with paper muffin cups.

© shoutingforha
Fill each muffin cup 3/4 full with dryer lint or sawdust.  My mom always used sawdust, but since I didn't have any on hand I decided to use some of my never-ending supply of lint.  Try not to be too grossed out by the dog hair and other bits of nastiness lurking in my lint.

© shoutingforha
Using your scissors, cut the wicks into 1.5 - 2 inch pieces and place one in each muffin cup.  I like to make sure that one end of the wick is tucked underneath the lint or sawdust and the other is sticking out over the edge of the muffin cup.

© shoutingforha
Add a few pine cones on top of the lint.  I'm using some of the tiny pine cones that fell off my neighbor's cypress tree.  Feel free to substitute bigger pine cones or even a bit of pine straw or wood chips.  Just use whatever you happen to have on hand.

© shoutingforha
Remember all that wax you melted?  Carefully pour the wax over the dryer lint, wick and pine cones.  Make sure you use a hot pad when you pick up the can as the metal will be hot.  Allow the wax to harden before removing the fire starters from the muffin tin.

You can store the fire starters in a basket by your fireplace for easy access.  If you plan on using your fire starters to light your outdoor fire pit, I would recommend keeping them inside during the summer months as the wax is no match for the hot temperatures.

© shoutingforha
To use one of these handy-dandy fire starters, simply place a few logs in your fire pit.  Tuck some crumpled newspaper and a few twigs between the logs.  Place one of the fire starters on top of the paper.  Place one of your fire starters on top of the paper.

© shoutingforha
Light the wick and wait for the fire to ignite all of the kindling and the logs.  It's that simple.

© shoutingforha
My fire looked like this within two minutes.  The best part is that it only took one match.

I hope you will give these simple fire starters a try.  They make a sometimes trying task so much easier.

~~~~~

This post is part of Works For Me Wednesday over at We Are THAT Family.  Pop by for some more handy tips. 

1.25.2012

Pocket Hearts

© shoutingforha
My sister is the proud mama to three beautiful little kids, two girls and a boy.  In addition to taking care of her brood and running her household, she works full time.  I honestly don't know how she manages to get it all done.  I know that I wouldn't last a minute in her shoes.

© shoutingforha
Her oldest daughter is an independent first grader that is overflowing with boundless energy, never runs out of things to talk about, is deeply thoughtful and loves to be creative.  The wee man of the house is only sixteen months old.  Although he is learning to talk and races around like a maniac, he still requires a lot of attention as all tiny people do.  

© shoutingforha
The middle child, my niece, well... She reminds me of my boy.  She is silly, talkative, feisty and, at times, highly emotional.  She also has this incredibly tender side that loves to snuggle and longs to be near the people she loves every moment of every day.  Needless to say, she has been having a hard time when her beloved mommy heads off to work.

© shoutingforha
My sister and I were discussing this situation last week (she always calls me during her commute home).  Her desire was to find some way to remind her sweet little girl how much she loves her even when they can't be together.  

I suggested a jar of pocket hearts.  

© shoutingforha
I had remembered seeing the cute little felt hearts in one of our local shops several years ago, although I cannot remember where. The hearts can be tucked into a pocket within easy reach should a child need a little reminder of their parent's love.  I thought they would be perfect for my niece.  

© shoutingforha
My sister loved the idea, but since she works harder than anyone else I know, I offered to do all the crafting myself.  To make the pocket hearts, I cut hearts out of different colors of felt, stuffed them with a little bit of polyfill and used embroidery floss and a simple blanket stitch to seal the edges. 

© shoutingforha
The hearts are so easy to make that I decided to give my sister an entire jar full.  With three kids, it's only a matter of time before a few disappear like so many socks in the laundry.  Besides, sharing is highly overrated.

***  UPDATE:  A friend told me that Curly Birds recently did a post on pocket hearts over at her blog.  Stop by and check them out.

12.21.2011

Fort Building Kit

© shoutingforha
Are you ready for a new craft project?  Great!  I've got a really fun one today.

I'm going to show you how to make a Fort Building Kit just like the one I made as a Christmas present for my six-year-old niece.  Don't tell my boy, but I made him a more manly version as well.  I got the idea from Saltwater-Kids

My niece is just at the age where she wants to have a little space away from her two younger siblings.  This is especially true when her best friend comes over to play.  It's can be incredibly hard to do big girl things when your three-year-old sister and one-year-old brother keep pestering you.  My hope is that the Fort Building Kit will allow her to create her own special place that she can play.

Here's what you need:

© shoutingforha
I picked up two big sheets at my local Goodwill for $1.99 a piece.  My niece is all girl so I tried to select some that were especially pretty.

© shoutingforha
I cut strips of cloth from one of my hubby's old T-shirts to make some tie-downs.  I sewed one strip onto the each of the 4 corners and the midpoint of each side of the sheets.  

© shoutingforha
The rope is simple clothesline rope that I picked up at the dollar store along with the clothespins.  To make it a little more fun, I dyed the clothespins by letting them soak for a few minutes in a glass of water that I tinted with a few drops of food coloring.  Once they had soaked up a little color, I laid the pins out on a few sheets of paper towels to dry.

© shoutingforha
The big metal clips are from Home Depot and only cost $0.99 each.  The smaller clips and the flashlight were dollar store purchases as well. 

© shoutingforha
I made a drawstring bag from one of my hubby's old dress shirts to store the rope, clips and flashlight. 

© shoutingforha
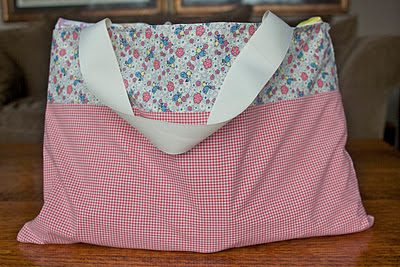
The storage bag was made with more of the shirt fabric and a complimentary scrap I had in my fabric pile.  The handles are made from an old piece of grosgrain ribbon.  I liked the idea of using fabric that I already had on hand, and since my Christmas shopping has been done for weeks, I had more than enough time to get it done. 

If you can't sew or simply don't have the time, you could easily use a bag of your choice instead.  The whole point is to have some sort-of bag to keep all the fort making supplies in one place.

I hope you will make this Fort Building Kit for someone that you love.  It will provide hours of fun and costs less than $10 to make.  What could be better than that?

12.16.2011

The Quiet Book - Girly Version

© shoutingforha

Today I would like to share another version of my felt Quiet Book.  This one was made for an adorable little girl named Emmie. 

© shoutingforha

The majority of the pages are identical to the other book, although you might notice a slightly pinker color palate.

© shoutingforha

I used an assortment of old buttons for the wheels on the train.

© shoutingforha

All of the removable pieces, like the moon and stars, are made from two pieces of felt that have been sewn together and are attached to the book with a piece of soft velcro.

© shoutingforha

A friend gave me the scrap of pink fabric with the farm girls on it.  I thought it would be perfect behind one of the barn doors.

© shoutingforha

For this girly version of the Quiet Book, I decided to make a purple mitten.  It's just the right size for a tiny hand to slip inside. 

© shoutingforha

Even the shoe has a feminine flair.  They eyelets of the shoe are made from grommets that I stitched around with embroidery floss to make them extra secure.  I picked up the belt at our local thrift store for $1.00.

© shoutingforha

I used fabric paint to write all of the words and mark the places for the shapes.  I also use the paint to add little details to the book like the friendly faces on the fish and the message on the letter. 

© shoutingforha

When I make a quiet book, I like to personalize it to suit the child I'm making it for.  In this case, the little girl loves to play with her mommy's makeup. 

© shoutingforha

I hope she will enjoy pretending to put makeup on the lady's face instead of ruining her mother's expensive stuff.  

© shoutingforha

One of my favorite pages of the book is the tent.  Children love unzipping it to reveal their own sweet face.  As before, the picture can be easily swapped out for another.

© shoutingforha

I hope that Emmie will get as much joy from her book as I had making it.  

I've had a few people ask for a supply list.  Here goes:
11 white felt sheets 
3 red felt sheets
5 pale blue felt sheets
2 lime green felt sheets
1 orange felt sheet
2 yellow felt sheets
1 black felt sheet
2 navy blue felt sheets
1 pale pink felt sheet
1 medium pink felt sheet
1 bright pink felt sheet
1 bright blue felt sheet
1 cream felt sheet
1 bright purple felt sheet
1 dark purple felt sheet
1 turquoise felt sheet
1 gray felt sheet
1 dark green felt sheet
1 army green felt sheet
1 brown felt sheet
misc. scraps of animal print fabric
4 1/2 feet of ribbon in a complimentary color
1 pkg. soft velcro
11 buttons
24 large grommets
6 small grommets
1 shoe lace
1 belt 
3 snaps
1 short zipper
fabric paint in a variety of colors
To check out a Quiet Book I made for a little boy, click here

*** Feel free to use my design to make a quiet book for someone that you love. That said, I request that you refrain from using my design to create products for sale. Thanks!
Related Posts Plugin for WordPress, Blogger...